Description
This Valentine’s Day Sugar Cookie Fudge is creamy, colorful, and irresistibly rich—perfect as a quick dessert, thoughtful homemade gift, or a festive addition to your party table.
Ingredients
Scale
- 2 1/2 cups white chocolate chips
- 1 can (14 oz) sweetened condensed milk
- 1/2 cup sugar cookie mix
- 1 teaspoon vanilla extract
- 1/2 teaspoon almond extract
- Red or pink food coloring
- 2 tablespoons festive sprinkles
- 1/2 cup white chocolate (for drizzling)
Instructions
- Prepare the Pan: Begin by lining your 8×8 inch pan with parchment paper. This will not only help the fudge detach easily once set but also maintain its shape. Lightly grease the parchment with cooking spray to ensure a seamless release, making the entire process effortless.
- Melt the Chocolate: In a microwave-safe bowl, combine the white chocolate chips and sweetened condensed milk. Microwave the mixture in 30-second bursts, stirring in between each interval until smooth and fully melted. This gradual heating prevents burning the chocolate, resulting in a creamy base.
- Mix in Flavors: Once your chocolate mixture is smooth, it’s time to bring in that nostalgic flavor! Stir in the sugar cookie mix, vanilla extract, and almond extract. The sugar cookie mix will add a delightful sweetness and texture, while the extracts will enhance the flavor profile, making it richer and more enticing.
- Add Color: To create the festive look for Valentine’s Day, add a few drops of red or pink food coloring to the mixture. Using a spatula, gently swirl the color until you achieve your desired shade. The swirls not only add a pop of color but also contribute to the adorable aesthetic of your fudge!
- Incorporate Sprinkles: Now it’s time to add a fun element! Fold in the festive sprinkles, which will not only sprinkle color but also provide a delightful crunch against the fudgy base. This step can be quite festive, so feel free to involve kids in the mixing!
- Pour and Smooth: Carefully pour the mixture into the prepared pan, using your spatula to smooth the top evenly. This will create a polished surface, making your finished fudge look even more appealing. Make sure to fill the pan adequately, smoothing down any edges to avoid unattractive rough spots.
- Drizzle White Chocolate: Melt the remaining half cup of white chocolate separately. Using a spoon or a squeezable bottle, drizzle it over the top of the fudge in an artistic pattern. This drizzle not only enhances the look but also adds a delightful burst of white chocolate flavor.
- Add Extra Sprinkles: Before chilling your fudge, sprinkle a few more festive sprinkles on top of the drizzle to give it an extra festive touch. This extra layer of sprinkles ensures a marvelous presentation.
- Chill and Set: Place the pan in the refrigerator and allow it to chill for about 2 hours or until firm. Chilling helps the fudge set properly, making it easier to slice into neat squares once ready.
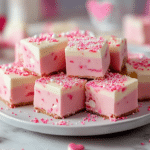
- Slice and Serve: Once the fudge has set, lift it from the pan using the edges of the parchment paper. Place it on a cutting board, and slice it into small squares. Each square should reveal beautiful marbled colors and sprinkles—perfect for sharing or enjoying on your own!
Notes
Ensure your white chocolate is of high quality for the best flavor and creaminess. Cheap chocolate can seize up and ruin the texture.
- Prep Time: 15 minutes
- Cook Time: 2 hours
- Category: Dessert
Nutrition
- Calories: Approx. 120 per piece
- Sodium: 50 mg
- Protein: 2 g